Questionnaire#
User Guide - Interactive Project Setup#
The scarlet2 questionnaire is an interactive tool designed to help you quickly set up a new scarlet2 project by generating a customized code template that matches your use case.
Running the Questionnaire#
To run the questionnaire, you need to import and call the run_questionnaire function from the scarlet2.questionnaire module:
from scarlet2.questionnaire import run_questionnaire
run_questionnaire()
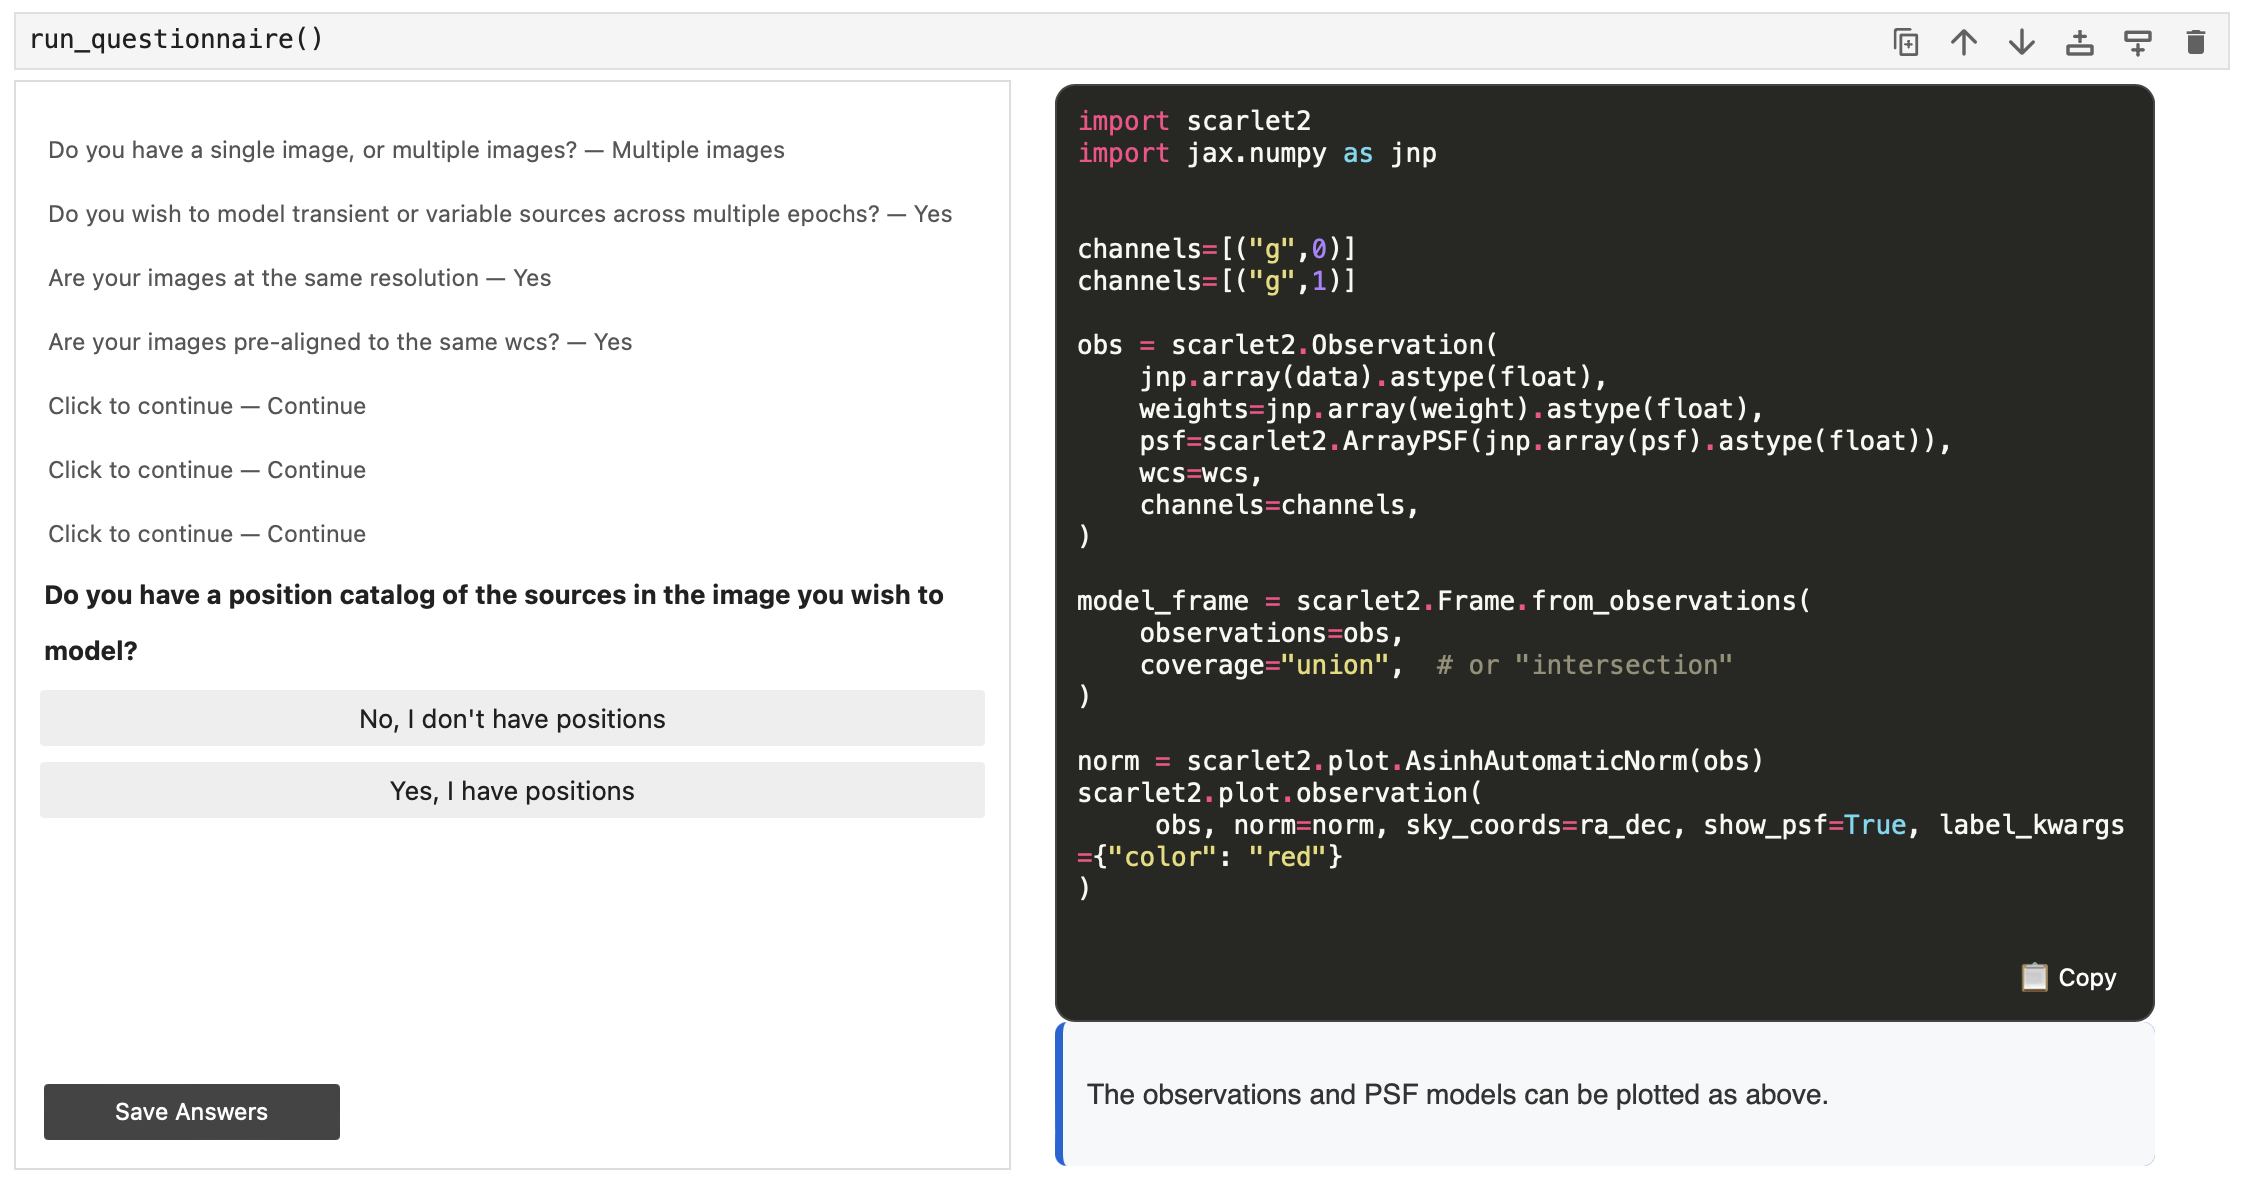
This will launch an interactive widget in your Jupyter notebook that guides you through a series of questions about your project and your data.
The questionnaire presents one question at a time with multiple-choice answers. For each answer you select, the questionnaire will update the code template to match your choices and display some explanatory text to help you understand the code being generated.
You can navigate through the questions using the answer buttons. If you want to change a previous answer, you can click the previous question in the list to go back to that question.
Using the Generated Template#
As you progress through the questionnaire, a code template is dynamically generated based on your answers.
The code will outline the steps needed to set up your scarlet2 project, but it will require some manual editing
to fill in specific details about your data. For example, the code will include definitions of example values
for variables like channels that you will need to replace with values that match your data, and will
reference variables like data and psf that you will need to change to use your actual data.
In the bottom right of the code output, you can click the “📋 Copy” button at any time to copy the generated code to your clipboard.
Note: The template is a starting point that you can modify to fit your specific data. It provides the structure for your project based on your use case.
Saving Your Progress#
If you want to save your questionnaire answers and return to them later, you can use the Save Answers
button in the bottom left of the questionnaire widget. This will save your answers to a yaml file that you can
then load later and continue from.
The yaml file will be saved to your current working directory with a filename like
scarlet2_questionnaire_timestamp.yaml. To change where the file is saved, run the questionnaire with the
save_path argument:
from scarlet2.questionnaire import run_questionnaire
run_questionnaire(save_path="path/to/save/directory")
To load a previously saved questionnaire, use the answer_path argument to specify the path to your saved
yaml file:
from scarlet2.questionnaire import run_questionnaire
run_questionnaire(answer_path="path/to/saved/answers.yaml")
Feedback and Issues#
If you encounter any issues or have suggestions for improving the questionnaire, please fill out our feedback form!
Developer Guide - Questionnaire Architecture#
The questionnaire module is designed to be extensible and maintainable. This section explains how the questionnaire works internally and how to modify or extend it.
Module Structure#
The questionnaire module consists of several key components:
questions.yaml: Stores the actual questions, answers, and templates
models.py: Defines the data structures used by the questionnaire that map to the YAML file
questionnaire.py: Contains the main
QuestionnaireWidgetclass that uses ipywidgets to render the UI and handle user interactions
YAML Structure#
Setting up the questions in the questionnaire is done by modifying the questions.yaml file.
The questions are defined in this YAML file with the following structure:
initial_template: "{{code}}"  # The starting template with placeholders
initial_commentary: "Welcome message"  # (Optional) The initial commentary text before any questions are answered
questions:  # List of top-level questions
  - question: "Question text" # Each question object has a question text, answers, and optionally a variable
    variable: "variable_name"  # Optional variable to store the answer to be referenced later
    answers:
      - answer: "Answer option 1" # Each answer has an answer text
        tooltip: "Helpful tooltip" # Optional tooltip for the answer that appears on hover of the button
        templates:  # A list of code snippets to apply if selected
          - replacement: code  # The placeholder to replace
            code: "# Your code here\n{{next_placeholder}}"  # The replacement code
        commentary: "Explanation of this choice" # The commentary text to display when this answer is selected, can include markdown formatting
        followups:  # Additional questions to ask immediately if this answer is selected. This list of followups matches the structure of top-level questions, and can include question objects or switch/case objects
          - question: "Follow-up question"
            answers: [...]
  - question: "..." # More questions
    answers: [...]
  # ...
  - switch: "variable_name"  # Conditional branching based on a previous answer
    cases:
      - value: 0  # If the question with variable "variable_name" was answered with the first answer (index 0)
        questions: [...] # The questions to ask in this case. This list matches the structure of top-level questions, and can include question objects or switch/case objects
      - value: null  # The default case if no other case matches or if the variable was not set (e.g. the question was skipped) If there is no default case, the switch is skipped
        questions: [...]
The questionnaire starts with an initial_template that contains placeholders (e.g. {{code}}) that will be replaced
as the user answers questions. Each question has a list of possible answers, and each answer can specify one or more
code snippets to replace the specified placeholders in the template, as well as commentary text to display.
The commentary can include markdown formatting which will be rendered in the commentary box.
Answers can also specify follow-up questions that are asked immediately after the current question if that answer is selected.
The flow of questions can also include conditional branching using switch objects that check the value of a
previously answered question (by its variable name) and present different sets of questions based on the answer.
Note: In YAML, single and double quotes behave differently. Single quotes will treat backslashes as literal characters, while double quotes will interpret backslashes as escape characters. For example, to include a newline character in a string, you would use double quotes:
"Line 1\nLine 2". If you used single quotes, it would be treated as the literal textLine 1\nLine 2without a newline.
The yaml file is packaged with the module as it is built, and is loaded using the importlib.resources module
that allows access to package data files even in a zipped package. With pyproject.toml and setuptools-scm,
any package data files that are tracked by git are automatically included in the package, and so the
questions.yaml file is included automatically when the package is built and deployed.
(See the setuptools documentation for more details)..
Data Models#
The questionnaire uses Pydantic models to define its data structures which are found in models.py.
These models match the structure of the YAML file and are used to parse and validate the questionnaire data
loaded from the YAML file.
Pydantic allows defining dataclasses with type hints and validation, making it easier to work with structured data like the questionnaire configuration. When the YAML file is loaded, it is parsed into these models for use in the questionnaire logic. If the YAML structure does not match the expected models, Pydantic will raise validation errors when the questionnaire is initialized.
QuestionnaireWidget Class#
The QuestionnaireWidget class is responsible for rendering the questionnaire UI and handling user interactions.
It uses ipywidgets to render the questionnaire in the output of a jupyter cell. The class maintains the
state of the questionnaire, including the current question, the user’s answers, and the generated code template.
The state consists of:
self.code_output: The current code template with placeholders. This is updated as the user answers questions. Regex is used to find and replace placeholders in the template when updating with answer templates.self.commentary: The current commentary text that explains the generated code. This is set with each answer.self.questions_stack: A stack of questions to ask. This allows for handling follow-up questions and branching logic. The next question is popped from the stack when needed.self.question_answers: A list of tuples of (question, answer_index) representing the user’s answers to each question. This is used to display the history of questions and answers in the UI.self.variables: A dictionary mapping variable names to the index of the selected answer. This is used for switch/case branching.
The UI consists of a question area with a list of the previous questions and answers and a set of buttons for the current question’s answers, and an output area that displays the generated code template and commentary text.
The question area uses ipywidgets components to display the questions and answer buttons, and handle the user
input. The output area uses a HTML widget to display the generated code with syntax highlighting, the copy
button, and the commentary text. Since the output area is written in HTML, the code defining the output area
is stored in separate HTML template files (output_box.html.jinja and output_box.css) for easier editing.
These template files are also included in the package using setuptools-scm the same way as questions.yaml.
The jinja2 templating engine is used to render the HTML with the generated code and commentary. For syntax
highlighting, the pygments library is used to convert the code into HTML with appropriate styling, and the
commentary text is converted from markdown to HTML using the markdown library.
Key methods include:
_get_next_question(): Determines the next question to display. A stack is used to manage the flow of questions, including handling follow-up questions and switch/case branching._handle_answer(): Processes user answers and updates the state._update_template(): Applies template changes based on answers._render_output_box(): Creates the UI for displaying the generated code. Uses Jinja2, pygments, and markdown for rendering.